
Keeping clients' computers safe and profitable for over 30 years
Home Forms About Current Newsletter subscribe
Search All Articles
Browse by Category
Working with pdf

Preview:
Getting the most out of your PDFXchange software. I discuss the most important features of the free and paid versions and how to use them.
Getting the most out of your PDFXchange software. I discuss the most important features of the free and paid versions and how to use them.
As many of you know, I setup new computers with PDFXchange Editor software. I started this because it was so much faster and safer than the Adobe product. It also had many more functions my clients could use for free. The company continues to improve and add features, so now this free software not only reads PDF files, but has over 200 additional features. However, most of my clients simply use it to read PDF files.
With 200 additional features, even in the free version, there are a lot of settings that you might miss. So, I'll review some settings I find most important as well as some particularly useful features for me.
Three Views
PDFXchange offers three different views you can use when working with the program.
- The older classic view or
- The newer ribbon view and
- The very new touch UI for touch screens.
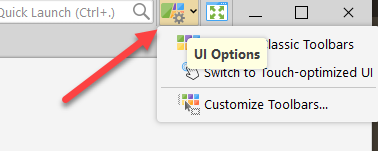
You can play with these views to see which suits you best. I've slowly converted over to the ribbon view.
Way over on the right at the top of the taskbar is the switch you can use.
A range of comments
One useful feature is being able to comment on the PDF document. I use 3 comment tools.
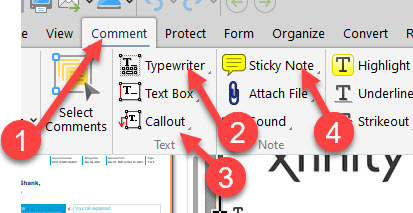
- Under the comment tab
- You can type anywhere you want, like you had an old typewriter. This is great for filling out forms that were designed to be printed, then filled in, and then scanned back.
- You can callout a section and comment on it with a callout
- You can add a sticky note.
Here's what they look like:

At the top, you'll see I used the typewriter tool to type after database settings. The callout tool is obvious. The Sticky note tool is a bit weird. You get this little note icon, which pops up the note when clicked.
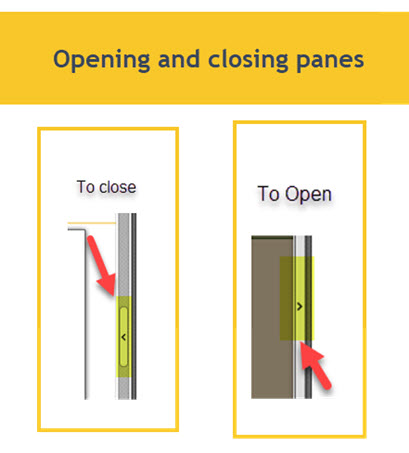
Panes
That is panes, not pains. Select the View tab, then way over on the right is the Panes pull-down tool.
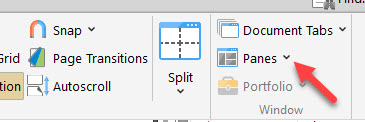
This gives you a plethora of options about which panes to show. I always show the Thumbnail pane and the Properties pane. Just check them. When I want to use Bookmarks, I check that as well. I often set bookmarks in long documents I'll be returning to.
The Thumbnails and Properties panes appear on the right and left. Each has a little open/close button in the middle that you can use to open or close the pane.
Properties lets you control the colors and fonts of your comments. Thumbnails presents each page in a thumbnail. Bookmarks lets you bookmark pages in long documents.
Select Text or the Hand?
When the program opens a document, there are two possible tools you can have selected for you. The hand allows you to move the document around. However, I choose the Select Text tool. It allows me to select text and copy it to another document through the clipboard, or change the font, or strike through or highlight, or many other things.
From the Home Tab, the Hand and Select text icons are the two on the left in the ribbon view. It is a little further to the right in the Classic view.
To set the default preference so it'll always open the way you want, open the File Tab and select Preferences. From preferences, scroll way down to the bottom of the categories and select Tools. Then make your choice.
Making a signature stamp
When someone wants me to sign a pdf document, I simply open the document and stamp my signature on it. I often fill in a document with the typewriter tool, then sign it with the stamp and return in just minutes after they sent it to me. There is no need to print it and fill it out, sign it, and scan it back to attach to an email.
The tricky parts
The tricky parts are handled for you by PDFxchange. But, just so you know what they are:
- You'll need to be able to resize your signature to whatever space is available.
- You'll need to make the background transparent, so it doesn't cover the signature line or other parts of the form.
Again, these are just handled.
Here's what you need to do.
Step 1. Make a signature
- Sign a piece of white paper with a dark pen.
- Scan that image into your computer as a jpeg or png file.
- Use Window's built-in Snip & Sketch tool to cut out the signature from the rest of the paper. You need a small image of just your signature, not an 8x11 piece of white paper with your signature on it.
Alternatively
Just use Window's built-in Snip & Sketch tool to snip out a signature you already have somewhere on some pdf document. Save it as a PNG or JPG file.
Step 2. Suck it into PDFXhange Editor
Once you have an acceptable signature, open pdfxchange editor to the Protect tab and choose Manage
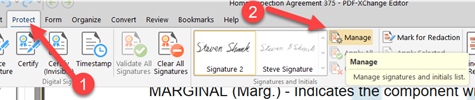
From Manage, you'll want to add the file you made and then click ok. Be sure you check Remove background.
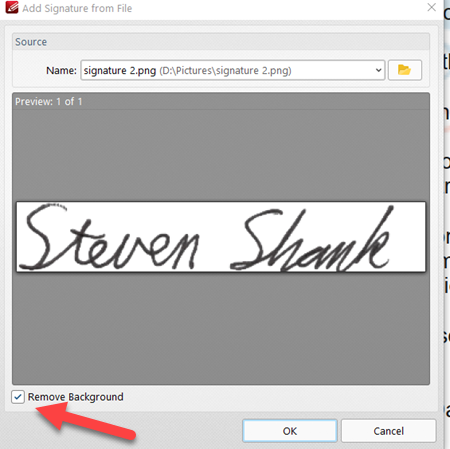
You can password protect your signature. From then on, you can just select the signature with your mouse and put it wherever you like. Then adjust the size, so it looks perfect.
Some other free features
Some of the other features of the free version include:
- Converting images and MS Office documents to PDF
- Create hyperlinks to parts of the document or externally
- Search within the document
- Perform simple OCR (optical character recognition).
- Encrypting PDF Files
Paid versions
Licenses are perpetual. You can buy it once and forget it. But, they are constantly improving it and adding features. You get 1 year of updates with your purchase. However, they also offer 2 or 3 year maintenance contracts on purchase. I recommend the 3 year maintenance and get all updated features for 3 years. At the end of the three years, I renew my maintenance contract for a nominal fee.
Standard: These are a few of the features added to the standard paid version. It costs $46 - $77, depending on the length of your maintenance contract.
- Optimize file size
- Edit content
- Combine PDF files, and add or remove pages
- Bates Numbering
- Header and Footer support
- Move pages
- Design and Add Watermarks
Editor Plus: Includes these features in addition to the normal paid version features. It costs $59-$77 depending on the length of your maintenance contract. $77 includes all updates for 3 years.
- Enhanced OCR
- Create editable and fillable forms
Some Tutorials for the paid version
- Editing documents:
- Inserting a pdf document with drag-and-drop
- Securing your PDF Documents:
- Obtaining digital IDs for signing documents:
Further reading
- Feature comparison chart
- Pdfxchange help site:
- Knowledge base:
Date: January 2022

This article is licensed under a Creative Commons Attribution-NoDerivs 3.0 Unported License.